Sunday, November 8, 2009

Weathervane

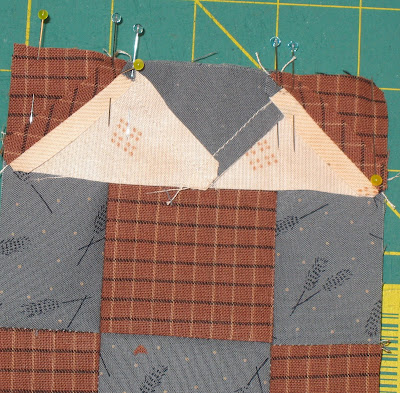
A slightly different Weathervane than I normally do, but hey, Viva le differance!
I used mostly Marti Michell templates.
I used Marti Michell templates, N79, D29, B12, B14 and the rectangle was rotary cut.

Reddish brown – cut 4 N79
cut 1 B12
cut 8 D29
Grey – cut 4 B14
Cut 4 1 ½” x 2 ½” rectangles (use N79 to trim corners)
Tan – cut 4 N79
Cut 8 B14

Piece the center as an uneven nine patch (should measure 4 ½” x 4 ½” at this point)

Top and bottom rows and sides – stitch tan triangle to grey triangle to tan triangle

Top and bottom rows and sides - stitch reddish brown triangles to tan triangles
Top and bottom row, stitch tan squares to reddish brown triangles
Stitch sides to center 9-patch (center rows). Use a positioning pin to get your points to match your seams

Stitch top and bottom rows to center rows

Saturday, November 7, 2009

Kitchen Woodbox

Kitchen Woodbox could be done several different ways, but is shown here being paper pieced. Trim the pattern so that there is a little extra all around.

Precut the pieces you will need, also a bit larger than necessary. Center square 2 3/4" square, cut dark and red strips 1 3/4" wide, then subcut dark: two 2 3/4" long, two 4 3/4" long and red: four 5" long. Corner triangles-cut two squares 3" then cut diagonally

Center the center square on the side without lines, baste (set machine to its longest stitch) in place with a few stitches

Trim center square so that 1/4" extends on two sides of the center. This helps to align the next pieces

put short dark strips on center square, aligning long edge with just trimmed center edge, flip pattern over, sew on line. press to side.
Trim extra to 1/4" Put add-a-quarter or other 6" rotary cutting ruler with 1/4" line on sewing line

Fold paper gently back over ruler and trim exposed fabric. Make sure you only trim the extra seam allowance!

Keep adding strips and trimming. When you get to the last red strips, make sure they are centered, the edges should extend beyond the seams at least 1/4"

Trim the corner off the red strips before adding the final background triangles.

To avoid see-through, make sure your triangles cover the red, but just barely so you can cover the triangle and have enough seam allowance. Pin to keep in place, avoiding the seam line area.

Finished block with paper still attached.

Remove the paper, press block, and line up the center of the block with you 6 1/2" squaring up ruler, then trim on all four sides

Finished block (front)

Finished block (back)

Thursday, November 5, 2009

Cut Glass Dish

Cut Glass Dish is a block with many HSTs. I chose to make them using the cut squares an inch bigger than needed and trim them to size method. I only needed 24, but I think I ended up making a lot more, 28 maybe, because I kept losing the darn little things.
Cut two strips of fabric 2" wide by at least 24" long (and a bit), subcut into 2" squares, If you stack the fabric strips right sides together before cutting they are all set to sew the diagonals.

Mark and sew diagonal lines 1/4" from the center


Cut on the diagonal, press to dark side, then trim to 1 1/2" square


Use MM template B-12 to get a wide enough strip cut

Cut 3 squares using B-12


Assemble the HSTs into pairs. Lay out all of the pieces so you get the right sides sewn together!

Then sew some of the pairs into rows of 4 HSTs each (need 4 of these)

Pin your HST rows together. Be careful to check that once pinned, all of the seam allowances are in the same orientation. Otherwise the seams won't nest nicely for the next step! See how the pin heads are easy to grab and pull out as you get to them?

Assmebled into rows

Finished Cut Glass Dish

Here you can see how the seams are pressed

Wednesday, November 4, 2009

Autumn Tints

Autumn Tints, aka Double Four Patch, only with different coloring

I used MM templates A1 and A5, cuting 2 large squares (A1), and 4 background squares, and two each of darker squares for the four patch (A5)


I pinned each set of smaller squares with 1 pin so that I could make sure the edges came out even.

I removed the pin when I came to it, holding the squares with my finger against the presser foot to keep it from shifting.

I returned the pieces to the layout area to make sure everything was sewn correctly.

Press the seams towards the darker square so the seams nestle against each other. Pin again, making sure the seams are right next to each other, and another pin at the end.

Press this seam open to keep the block flatter and true to size. Pin the larger square to the four patch, sew, press towards large square.
Sew the last seam, pinning at intersections and at the end. Press this seam open.

half square triangles

What are Half Square Triangles (HST)? Really, they are two triangles sewn together that make a square. Each triangle has a Right angle (90 degrees) that makes up one corner of the square. Two right angles, two corners. The other two corners are composed of triangle tips that are sewn together to make a right angle.
Most of the HSTs we sew will be anywhere from ½” finished to 3” finished size. That does not include the seam allowance!
How many ways are there to make half square triangles? Several, maybe even lots. Let’s look at a few.
1. To make two HST: Cut a square of each color 7/8” larger than the finished size, cut in half diagonally, put color 1 triangle right sides together with color 2 triangle, sew ¼” seam on long edge. Press.
Con – cutting diagonally sometimes doesn’t get exactly from tip to tip, making triangles not the precise size
Con – sewing on bias edge can stretch
Con – that pressing part, I generally get it skewed, ways to not do this, finger press open, then just put iron down on seam, don’t move it around. Or, press with the grainline (works better on larger triangles)

2. Almost like #1: Cut a square of each color 7/8” larger than the finished size. On the lighter fabric draw diagonal lines ¼” away from center diagonal (only one of them!); put right sides together, stitch on drawn lines (or right next to them inside the seam allowance); cut between stitching; Press
Pro – stitching before cutting minimizes cutting errors and bias stretching
Con – the pressing part

3. Almost like #2: Cut a square of each color 1” larger than the finished size. On the lighter fabric draw diagonal lines ¼” away from center diagonal (only one of them!); put right sides together, stitch on drawn lines; cut between stitching; Press; Use small square ruler with diagonal to trim to appropriate unfinished size
Pro – stitching before cutting minimizes cutting errors and bias stretching
Pro – trimming after pressing gets you a perfect HST
Con – more steps

4. If making a lot of HSTs using the same fabric, use either Marsha McCloskey’s method or Debbie Caffrey’s method (same as Sharon Schamber’s method)
Cut a large square of each fabric. Cut Diagonal strips. Alternate strips, sew together on bias edges (slightly different for each method). Cut out HST the correct unfinished size.
Pro – you get perfect HSTs
Con – works best if you need lots of the same HSTs

5. Use templates, and again here there are a few ways.
5a. Marti Michell templates – several sizes are available down to 1” finished triangles, generally in ½” increments, great for machine piecing, not so much for hand (if you need a seam line). Use Invisi-grip to keep template from slipping.
1” – N80 or D29 (also in Just half square triangles)
1.5” – A6
1.75” – E35
2” – B13 (also in Just half square triangles)
2.5” – Q94, E
3” – A1 (also in Just half square triangles)
3.5” – E32
4” – B9 (also in Just half square triangles)
5” – in Just half square triangles

5b. Paper templates – I put a 1/16” hole using a paper punch at the corners (seamline intersections) when hand piecing, don’t really need it for machine
Put DST (double sided tape) on the wrong side of the template (keeps it from slipping). Using your rotary cutter, place ¼” on the seam line and cut out shape. I try to add the special MM template corners when doing this, makes it easier to line things up. EQ corners are similar. This method is useful for those 5-patch blocks you don't want to paper piece.

5c. Template plastic templates - I put a 1/16” hole using a paper punch at the corners (seam line intersections). Mark the fabric through the holes, draw between the dots. Using your rotary cutter, place ¼” on the seam line and cut out shape. The drawn seam line is great when hand piecing, but also machine piecing, especially when doing Y seams (not that we are with HSTs )

After your pieces are cut, if necessary trim the points. This is taking off the extra 3/8” tip at the skinny corners. It makes it easier to line things up when sewing, and your tips don’t get sucked into your sewing machine. There are various tools for this. Use any MM triangle template. Fons and Porter makes one, as do others. You can also use your regular rotary cutting ruler, cut a line perpendicular to the diagonal, ¼” away from the seam intersection (this is when those dots can be handy).

Pin close to the end of the diagonal. You can use this to guide the triangle, and keeps the ends lined up. Use a skinny pin to minimize distortion.
Sew the diagonal seam. Use an awl, long pin, or seam ripper to smooch the upper fabric towards the needle if you don’t have an even feed built into your machine. Remove the pin just as you get to it, keep the awl point on the triangles to keep them in place, remove pin, keep sewing to end with awl holding the fabric to maintain your ¼” seam all the way.

Set your seam with the iron, finger press open, then press with iron, being careful not to distort your HST. Measure it and see how good you got. If it is just a little wonky you can generally pull it into place.

Tuesday, November 3, 2009

Supplies

We all have our standard supplies for making blocks. I favor machine piecing, and not paper piecing if I can do it “easily” with the rotary cutter, just so I don’t have to remove the paper afterwards. There are a few things I have found to be helpful when making smallish, traditional blocks.

Marti Michell (MM) templates – these come in various sets, A, B, C, E and N will do most 4 patch, 9 patch and many eight pointed stars. The 5-patch set will not do 6” blocks, neither will the 7-patch. Too bad.

When cutting using these templates I like to use my Brooklyn revolver. Omnigrid’s rotating cutting mat also works, but it is not as smooth to turn. Or any smallish cutting mat that you can pick up and turn around. Or walk around a table.

When using small acrylic templates, I have found Omnigrid’s Invisi-grip helps to keep the templates from slipping. Before I discovered Invisi-grip I used double sided tape. This only works so long, and can be hard to remove. Double sided tape (DST) should be used on the top of MM templates because the writing is on the bottom. DST will remove the letters after a while. I still use the DST when using paper templates and a rotary cutter

Electric Quilt – I use EQ extensively for making templates that are not available from MM or easily cut with a rotary ruler and for printing paper piecing patterns. Tracing the pattern from the book or pattern is another option.

Thread – I like Aurifil the best, but also like Superior’s Masterpiece. There are others out there I have not tried (Prescencia comes highly recommended). Whatever you use, it should be thin and strong. Fat thread makes folded fabric fatter, making the block smaller.

Thin pins – I prefer Clover extra fine patchwork pins with the glass head. They have an extra sharp tip and the thin shaft keeps the fabric from bunching up. Be careful to remove before your sewing machine hits one, they bend wonderfully (and can be hard to remove from your fabric).
Rotary cutting rulers – a standard 6”-8” wide by 24” long for cutting strips
A 6 ½” square for squaring up your finished block, should have a diagonal line in at least one direction and subcutting strips into smaller pieces
A 3 ½” square for use in making half square triangles (HST) (could use a larger one, but I find this size the easiest for these small blocks)
Ideally all of your rulers should be by the same manufacturer. In reality, this seldom happens.

A sharp sewing machine needle, not universal – I use Jeans 80/12, or Top Stitch or Quilting (quilting needles are for piecing, not the actual quilting)

Iron – a small one is nice, but any is fine

Additional for paper piecing
Paper – I like Carol Doak’s brand, but there are others that work as well. I like it to tear easily, so you don’t break or tear out your piecing thread. Thin regular paper works. Carol’s doesn’t smear, a plus.

Add an eighth or Add a quarter ruler, or another ruler that does the equivalent thing (omnigrid makes a 1” x 6” ruler, as does Quilter’s rule)
Pencil

Additional for hand piecing or odd templates
Pencil – mechanical .7
6” drafting ruler (the 1” x 6” with red marking, thin, not for rotary cutting)
Freezer paper – if using freezer paper method
1/16” paper punch – if using template method
Gridded template material (optional) – if using template method

Sunday, November 1, 2009

Six Inch Blocks

There are a lot of quilts out there comprised of six inch blocks. This blog will show how to constuct these blocks, as I make them