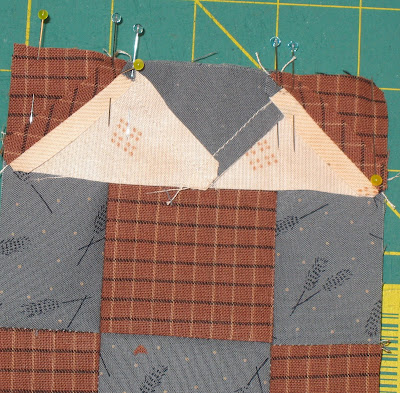
The Double four patch is made up of two 4 1/2" squares (B8)and eight 2 1/2" squares (B12)
Again, I lay them out to determine orientation and position
Option 1
Option 2
I went with Option 1, and initially sew the small four patches together. Once the first small squares are sewn, I lay them out again, to make sure the orientation is what I want.
Then the small four patches are finished and they are matched up with the larger square. If your seams are the correct size, you should not see any fabric peeking through when you align the four patch and the large square (see below)
Make two like the one below
Press towards large square, then layout, flip the top bit down, align seams, pin and sew (carefully, remove pin just as you get to it).
Six Inch Blocks
Construction techniques for six inch and eight inch quilt blocks
Monday, May 27, 2013
Block 2 - Four Patch
Sunday, May 12, 2013
Block 1 - Uneven Nine Patch
Starting off with a fairly simple block, the Uneven Nine Patch, all squares and rectangles
Center – cut one B8 (4 ½” square)
Corners – cut four B12 (2 ½” squares)
Sides – cut four D25 (4 ½” x 2 ½” rectangles)
Layout at shown, assemble the rows, pressing towards the pink fabric
Then stitch the rows together. Finishes at 8 1/2" including seam allowance.
Center – cut one B8 (4 ½” square)
Corners – cut four B12 (2 ½” squares)
Sides – cut four D25 (4 ½” x 2 ½” rectangles)
Layout at shown, assemble the rows, pressing towards the pink fabric
Then stitch the rows together. Finishes at 8 1/2" including seam allowance.
Thursday, May 9, 2013
Fabric line for 8 inch blocks
A long, long time ago I bought a collection of fabric, Jennifer Sampou's Victorian Wheeling (P&B Textiles, early - mid 1990s). I dug it out when I recently made this quilt
I have quite a bit left, and want to use it. This is a great collection, with a wide variety of prints and scales. The cream in the quilt above is Fairy Frost. I will probably use it as well, and black for the sashing.
Monday, May 6, 2013
Marti Michell Templates
I love Marti Michell templates, but you do not need them to make these blocks, just some will be easier.
Set B is the Basic 4" set. Set D add some additional pieces that are compatible with Set B.
B8 = 4" square: cut 4 1/2" x 4 1/2"
B9 = 4" HST: cut 4 7/8" square, cut once on the diagonal
B10 = 4" diagonal square: special piecing
B11 = 4" QST: cut 5 1/4" square, cut twice on the diagonal
B12 = 2" square: cut 2 1/2" x 2 1/2"
B13 = 2" HST: cut 2 7/8" square, cut once on the diagonal
D28 = 2" diagonal square: special piecing
B14 = 2" QST: cut 3 1/4" square, cut twice on the diagonal
D25 = 4" x 2" rectangle: cut 4 1/2" x 2 1/2"
D29 = 1" HST: cut 1 7/8" square, cut once on the diagonal
Peaky and Spike units can be made with D22 (Peaky), D23 (Spike) and D24 (ice cream cone).
D26 is used for a diagonal stripe, the larger half of a 4" HST.
D27 is used for Attic Windows sashing (4" window).
Eight Inch Sampler
I've collected a bunch of four patch blocks that I thought would be fun to make. I'll keep working on them until I run out of the fabric I plan on using, so I don't have a clue about how many of these will actually get made! I will be using Marti Michell templates, set B and D (4" sets). Starting soon.
Sunday, November 8, 2009
Weathervane
A slightly different Weathervane than I normally do, but hey, Viva le differance!
I used mostly Marti Michell templates.
I used Marti Michell templates, N79, D29, B12, B14 and the rectangle was rotary cut.
Reddish brown – cut 4 N79
cut 1 B12
cut 8 D29
Grey – cut 4 B14
Cut 4 1 ½” x 2 ½” rectangles (use N79 to trim corners)
Tan – cut 4 N79
Cut 8 B14
Piece the center as an uneven nine patch (should measure 4 ½” x 4 ½” at this point)
Top and bottom rows and sides – stitch tan triangle to grey triangle to tan triangle
Top and bottom rows and sides - stitch reddish brown triangles to tan triangles
Top and bottom row, stitch tan squares to reddish brown triangles
Stitch sides to center 9-patch (center rows). Use a positioning pin to get your points to match your seams
Stitch top and bottom rows to center rows
Subscribe to:
Posts (Atom)